![[horizontal wires applied to vertical rebar]](/images/hifcimages/small/1.m.horizwire1.jpg)
|
I'm standing inside the front left corner of the still-skeletal structure. The horizontal wires (9 gauge galvanized) connecting the rebar have been run between all the rebar uprights. They were attached using standard gauge rebar tie wire. A large roll of one-inch galvanized mesh ('poultry netting', 'chicken wire') is waiting at rear center.
|
|
The first layer of mesh has been applied to the right side rebar and horizontal wire armature. It has been attached to the outside of the armature using lightweight wire 'twist-ties', which are cut to suit from a roll of 20-gauge galvanized wire.
|
![[first layer of mesh applied to right side]](/images/hifcimages/small/1.p.mesh2.jpg)
|
![[closer view of rebar-wire-mesh matrix]](/images/hifcimages/small/1.o.mesh1.jpg)
|
A closer view of the combination of vertical rebar, horizontal wire and first layer of hexagonal mesh. The top few inches of the mesh has been folded over the top horizontal wire. The top of the rebar has been bent into a roof eave and gutter shape (at this point I was still planning to use ferrocement for the roof as well as the walls).
|
|
Here I'm rolling out the second layer of mesh, on the inside of the rebar and wire armature. A third layer of mesh was added, also on the inside. Each mesh layer was shifted slightly one way or the other so the hexagonal openings would not line up with previous layers. Each layer added this way reduces spacing between wires in the combined layers, making the final ferrocement composite stronger.
|
![[rolling out second layer of mesh on inside of wall]](/images/hifcimages/small/1.q.mesh3.jpg)
|
![[expanded metal lath partially applied to wall]](/images/hifcimages/small/2.d.meshandlath2.jpg)
|
A single layer of lightweight expanded metal lath was added on the outside of the outer mesh layer. This shows some areas with lath and some still waiting for it. All four layers were wired together, making a snug sandwich of the lath and mesh layers, horizontal wire and vertical rebar. This also shows how the foot of the wall follows the contour of the lava ledge that slopes down into the structure at bottom center.
|
|
Here is the metal lath applied to a rear corner of the structure. At right is mesh without lath on it yet. The rebar-framed rear door opening is visible at left. Portions of bent rebar roof cross-pieces are visible at top, wired to the verticals and aligned with the eave and gutter shape bent into them (these were removed when I decided not to try a ferrocement roof; until then they helped stabilize the armature while plastering).
|
![[lath applied to large curved rear corner]](/images/hifcimages/small/2.c.meshlayers1.jpg)
|
![[front view of nearly completed armature]](/images/hifcimages/small/2.e.meshandlath3.jpg)
|
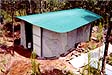
View from end of driveway - a somewhat ghostlike building shell is created by the nearly completed armature, with front and rear door openings clearly visible. The flexible nature of the wire and mesh armature enabled me to fit the wall contours to the building site terrain (rather than having to force the terrain to fit the building). Notice how I have built very close to the ridge rising up on the right without having to remove the trees growing out of it.
|


![[horizontal wires applied to vertical rebar]](/images/hifcimages/large/1.m.horizwire1.jpg)
![[first layer of mesh applied to right side]](/images/hifcimages/large/1.p.mesh2.jpg)
![[closer view of rebar-wire-mesh matrix]](/images/hifcimages/large/1.o.mesh1.jpg)
![[rolling out second layer of mesh on inside of wall]](/images/hifcimages/large/1.q.mesh3.jpg)
![[expanded metal lath partially applied to wall]](/images/hifcimages/large/2.d.meshandlath2.jpg)
![[lath applied to large curved rear corner]](/images/hifcimages/large/2.c.meshlayers1.jpg)
![[front view of nearly completed armature]](/images/hifcimages/large/2.e.meshandlath3.jpg)